今回はアンケート調査アプリの「公開用画面」を作ってみましょう。
公開用画面の作り方もとてもシンプルです。
やるべきことは大きく分けて下の3つになります。
テンプレートを作成
まずは画面テンプレートを作りましょう。
テンプレート・フォルダ構成は下記のようにします。
~/mysite/
polls/
templates/
polls/
index.html
detail.html
results.html
次にテンプレート・ファイルの置き場を settings.py に指定します。
~/mysite/mysite/settings.py
...
TEMPLATE_DIRS = (
  # Put strings here, like "/home/html/django_templates" or "C:/www/django/templates".
  # Always use forward slashes, even on Windows.
  # Don't forget to use absolute paths, not relative paths.
  '/home/username/mysite/polls/templates',
)
...
テンプレート・ファイル(HTML)の中身は下記のとおりにします。
~/mysite/polls/templates/polls/index.html
{% load url from future %}
{% if latest_poll_list %}
  <ul>
  {% for poll in latest_poll_list %}
  <li><a href="{% url 'detail' poll.id %}">{{ poll.question }}</a></li>
  {% endfor %}
  </ul>
{% else %}
  <p>No polls are available.</p>
{% endif %}
~/mysite/polls/templates/polls/detail.html
{% load url from future %}
<h1>{{ poll.question }}</h1>

{% if error_message %}<p><strong>{{ error_message }}</strong></p>{% endif %}

<form action="{% url 'vote' poll.id %}" method="post">
{% csrf_token %}
{% for choice in poll.choice_set.all %}
  <input type="radio" name="choice" id="choice{{ forloop.counter }}" value="{{ choice.id }}" />
  <label for="choice{{ forloop.counter }}">{{ choice.choice_text }}</label><br />
{% endfor %}
<input type="submit" value="Vote" />
</form>
~/mysite/polls/templates/polls/results.html
{% load url from future %}
<h1>{{ poll.question }}</h1>

<ul>
{% for choice in poll.choice_set.all %}
  <li>{{ choice.choice_text }} -- {{ choice.votes }} vote{{ choice.votes|pluralize }}</li>
{% endfor %}
</ul>

<a href="{% url 'detail' poll.id %}">Vote again?</a>
ビューを作成
次に views.py (ビュー)を作成します。
~/mysite/polls/views.py
# coding: UTF-8
from django.http import HttpResponseRedirect, HttpResponse
from django.shortcuts import render, get_object_or_404
from django.core.urlresolvers import reverse
from django.views import generic

from polls.models import Poll, Choice

#
# 一覧表示
#
class IndexView(generic.ListView):
  template_name = 'polls/index.html'
  context_object_name = 'latest_poll_list'

  def get_queryset(self):
    # 最新のPollデータを5件取得
    return Poll.objects.order_by('-pub_date')[:5]

#
# 詳細表示
#
class DetailView(generic.DetailView):
    model = Poll
    template_name = 'polls/detail.html'

#
# 結果表示
#
class ResultsView(generic.DetailView):
    model = Poll
    template_name = 'polls/results.html'

#
# 投票
#
def vote(request, poll_id):
  p = get_object_or_404(Poll, pk=poll_id)
  try:
    selected_choice = p.choice_set.get(pk=request.POST['choice'])
  except (KeyError, Choice.DoesNotExist):
    # Redisplay the poll voting form.
    return render(request, 'polls/detail.html', {
        'poll': p,
        'error_message': "You didn't select a choice.",
    })
  else:
    selected_choice.votes += 1
    selected_choice.save()
    # Always return an HttpResponseRedirect after successfully dealing
    # with POST data. This prevents data from being posted twice if a
    # user hits the Back button.
    return HttpResponseRedirect(reverse('results', args=(p.id,)))
URLマッピング定義
次は urls.py (URLマッピング)を polls/ の直下に新規作成します。
~/mysite/polls/urls.py
# coding: UTF-8
from django.conf.urls import patterns, url

from polls import views

urlpatterns = patterns('',
  # ex: /polls/
  url(r'^$', views.IndexView.as_view(), name='index'),
  # ex: /polls/5/
  url(r'^(?P<pk>\d+)/$', views.DetailView.as_view(), name='detail'),
  # ex: /polls/5/results/
  url(r'^(?P<pk>\d+)/results/$', views.ResultsView.as_view(), name='results'),
  # ex: /polls/5/vote/
  url(r'^(?P<poll_id>\d+)/vote/$', views.vote, name='vote'),
)
次に mysite/ の下の urls.py も下記のとおり編集します。
~/mysite/mysite/urls.py
from django.conf.urls import patterns, include, url

# Uncomment the next two lines to enable the admin:
from django.contrib import admin
admin.autodiscover()

urlpatterns = patterns('',
  # Examples:
  # url(r'^$', 'mysite.views.home', name='home'),
  # url(r'^mysite/', include('mysite.foo.urls')),

  # Uncomment the admin/doc line below to enable admin documentation:
  # url(r'^admin/doc/', include('django.contrib.admindocs.urls')),

  # Uncomment the next line to enable the admin:
  url(r'^admin/', include(admin.site.urls)),
  url(r'^polls/', include('polls.urls')),
)
これで公開用ページは完成です。
ブラウザからアクセスしたときに呼び出されるビュー(views.py)の処理は以下のとおりに紐付けられます。
http://localhost:8000/polls/ -> IndexViewsクラス
http://localhost:8000/polls/5/ -> DetailViewクラス
http://localhost:8000/polls/5/results -> ResultsViewクラス
http://localhost:8000/polls/5/vote -> vote() (第二引数の poll_id=5 が渡されます)
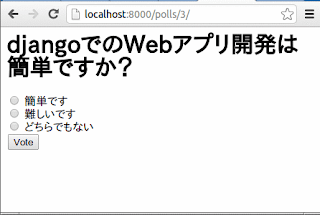
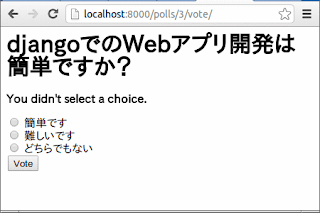
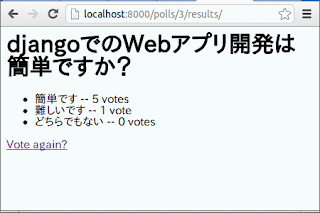
実際に動かしてみました。

indexページが表示されました。

何も選択せずにvoteボタンを押すとエラー「You didn't select a choice.」が表示されました。

voteボタンが完了すると結果ページが開きました。
以上です。
次回はDjangoを使ったテストの自動化をやってたいと思います。
0 件のコメント:
コメントを投稿